Best Practices for GitLab
This article is based on the author's own research and testing and does not guarantee the accuracy or completeness of the information provided.
If you use the information in this article, you do so at your own risk. The author assumes no responsibility for any issues or damages resulting from its use.
The Best Practices series.
My personal GitLab practices, so to speak.
* This is a rewrite of an old article, so some parts may differ from the current GitLab UI.
Introduction
I have had both things that worked well and things that did not work well while using GitHub personally and GitLab for work.
Based on these experiences, I will summarize some Tips such as:
- Things that may work well if you do them this way.
- Things that may fail if you do them this way.
- Features that may be useful if you use them.
* These are my personal Tips, so feel free to customize them as appropriate for each project.
* I will also describe some features that are probably rarely used at workplaces. Using them may improve the quality of a project.
Git
Learn the basic operations yourself.
If you use GitLab, you will probably use Git.
* There may be cases where Issue management is not used (for example, Redmine is used for task management while GitLab is used for source management, resulting in a mix of management tools).
If you are not confident about how to use Git, use methods such as the following to master the basic operations.
- Learn / research by yourself (books / Internet)
- Get used to it personally using GitHub, etc.
- Ask someone who knows it well.
Some companies may have few people who will teach someone from scratch when they have no idea what they are doing.
If you are not confident about the operations, randomly touching and breaking a branch that is actually in operation may be something that could get you kicked out depending on the company/project. Prepare a test repository and practice.
If you break the production environment without even practicing, you cannot really complain if people regard you as incompetent.
It is also possible to build an environment including GitLab + GitLab Runner with docker-compose, so if you want to experiment with various things, I recommend building the environment with Docker.
* I once saw someone who was not confident about how to use either Git or SVN, and people jokingly wondered whether they were really a developer (they weren't lying about their career history, were they?).
Permission Management
When adding members to a project, assign appropriate roles.
In Best Practices for cron, I wrote:
* GitLab should also allow you to restrict permissions for pushing. If you are going to require MRs, restrict direct pushes to designated branches, for example. Use tools to enforce the rules rather than relying on slogans.
When taking measures such as the above, you need to configure the settings so that merge/push to specific branches is allowed only for members with a specific role or higher.
* This can be configured from [Settings] > [Repository] > [Protected branches] in the project.
However, if everyone, including members of partner companies, has Maintainer permissions, appropriate restrictions cannot be enforced even if you configure the above settings.
I mentioned the inability to properly restrict functionality, but this is a security problem in the first place.
Maintainer permissions should be limited to employees only (preferably to a limited number of members who can make the appropriate settings), while normal developers should be assigned Developer permissions.
* From an audit perspective as well, assigning unnecessary permissions without a reason is probably not acceptable.
The following kind of situation is something I have seen fairly often even in companies, as is also the case with Redmine:
Why does this member have this role? The permission assignment is basically a free-for-all.
Giving permissions simply because they seem convenient is not a good idea. If you are doing this, fix it.
Branch Strategy
For projects that are already in operation, I assume there is a branch strategy for each project.
If there is already a defined way of operating the project and it is working well, use it.
Here is an example of a branch strategy I used in the past.
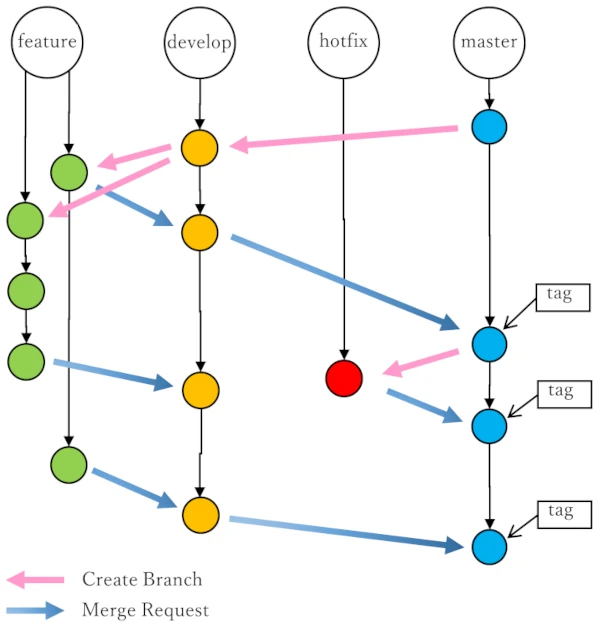
* It is similar to gitflow, so if you have used gitflow before, it should be easy to understand.
master(ormain)
For releases. It is deployed to the production environment.
Do not edit master directly.
When merging into master, create a tag.develop
The main development branch. Created from master.feature
A branch for each issue.
Created from the latest develop.
The branch name wasfeature/issueNNN(NNN is the issue number).
A separate branch is created for each issue, and after implementation is completed, it is merged into develop.
* Initially, there was also an idea of creating development branches for individual members rather than creating them by function. (A member had used that approach before.) However, with this approach, one functional change could span multiple branches (for example, when different developers are responsible for the frontend and server-side), so we stopped using this method.hotfix
Used when a critical bug occurs in master.
Created from master where the critical bug occurred.
The branch name ishotfix/issueNNN(NNN is the issue number).
After fixing the bug, it is merged into master.
When merging, create an MR and merge after review.
* Depending on the project member structure and the contents of the MR, self-review was allowed.
* The above rules work more easily when ticket-driven development is adopted as the development method (because an issue should always have been created). What should you do if you are not using ticket-driven development? Just make it ticket-driven development! (Recommended.)
* By the way, I once used the feature/#NNN format for branch names, but this format was discontinued because having # in a branch name caused problems with links to GitLab (the link did not work from Slack notifications). It is better not to include # in branch names.
Creating Branches
When adding a new feature or fixing a bug, create a branch according to the branch strategy defined/adopted by the project.
Branches can also be created on GitLab, but this has the following side effects.
- If you use
New Branchon GitLab, the created branch is committed/pushed, so CI/CD (Pipeline) is executed.
It would be nice if there were a way to determine in gitlab-ci.yml whetherNew Branchwas used from GitLab, but apparently this cannot currently be determined, so CI/CD is executed just by usingNew Branch.
This is inconvenient for the following reasons:- Unnecessary CI/CD runs. Various resources are wasted (computing resources, time, storage on the remote repository, etc.).
- It is easier to discover problems in CI/CD (Pipeline) if CI/CD runs only when a feature addition, bug fix, etc. is pushed. If a Pipeline runs every time a branch is created, there is a possibility that Pipelines will no longer be checked properly.
Based on the above, unless there is a special reason, I recommend creating branches using the following procedure.
- Create a branch locally from the source branch.
- Using the created local branch, make some changes (feature addition, bug fix, etc.), then build and test it locally.
- Commit locally.
- Push to the remote (GitLab).
For a newly created branch, the branch is created on the remote for the first time at this point, and CI/CD is executed.
The advantages of using the above procedure are as follows.
The remote branch is not created until an actual change (local Commit) is reflected (Push).
You may create a branch but ultimately not Commit/Push anything. In this case, no GitLab resources are wasted.Unnecessary CI/CD does not run.
WhenNew Branchis used on GitLab, CI/CD runs as described above. This means that the state of the latest commit on the branch from which the new branch was created (such as develop) is run through CI/CD again. Running CI/CD again for a Commit/Push that has already been checked by CI/CD is unnecessary.The Pipeline history does not get cluttered.
Related to the above, unnecessary Pipelines leave execution history that should not have been there in the first place. If a problem occurs in CI/CD and you need to investigate the past history, having a lot of this kind of history increases the investigation cost.
You can create branches in a development environment such as VSCode without using New Branch on GitLab. Create branches using the procedure above.
* Most members were creating branches using the above procedure, but at one point a situation occurred where a Pipeline was executed when some members used New Branch on GitLab. This resulted in "What is this Pipeline?", so I documented and rolled out the above procedure at the time.
* Some people may say, "Our project doesn't use CI, so it doesn't matter." However, there is always a possibility that CI will be introduced in the future. Fixing a method that members have already become accustomed to can be costly (depending on the members). I think it is better to adopt a method that causes fewer problems.
Commits
When committing, write an appropriate commit message.
When using ticket-driven development with GitLab, a commit is work corresponding to a ticket (issue) that was created beforehand, so include the issue ID in the commit message.
This automatically associates the issue and commit (cross-links are created).
When specifying the issue ID, use the #nnn format (nnn is the issue ID (a decimal number)).
Writing it at the beginning of the commit message makes it easy to understand and less likely to be forgotten.
* I have seen cases where someone put a space between # and nnn, as in # nnn, and the link was not created, so do not put a space between them.
* Even when tickets themselves are managed with Redmine, it is also possible to integrate them with the Git repository by using Redmine's repository feature (additional configuration is required).
Merge Requests
When performing a merge, always create a merge request (MR).
(Do not merge without an MR.)
- Click
Merge requestsfrom the GitLab menu. - The MR list screen will be displayed, so click the
New merge requestbutton. - Two branch input fields, Source / Target, will be displayed, so set each branch.
When doing normal feature development, they will be as follows. (This differs for hotfixes and merges to master. If you are unsure, consult someone knowledgeable.)
Source branch: the branch to be merged (feature/issueNNN)Target branch: the branch to merge into (develop)
- Click
Compare branches and continue. - You will be taken to the New merge request screen, so first check the changes.
If you scroll down the screen, theCommits,Pipelines, andChangestabs are displayed. Check that the following are correct. If there is a problem, stop creating the MR for the time being, resolve any problems with the branch creation procedure or file editing, and then create the MR again.
Commits
The commits included in the MR. If commits containing content different from what you are trying to merge are included, assume that there is some kind of problem.Changes
The file differences before and after the MR are included. Check whether the differences (changes) are correct. If changes that you did not make, or incorrect changes, are included, assume that there is some kind of problem.
- If there are no problems with
CommitsorChanges, configure the following MR contents as appropriate.
Title
Set the MR title as appropriate.Description
It is a good idea to write an overview of the changes included in the MR.Reviewer
If you want someone to review the MR, set that member as a reviewer. Even if you set this in GitLab, the other person may not notice it, so I recommend also notifying them that you would like a review via Slack or another means.
- Click
Create merge request. - The member who was asked to review checks whether there are any problems with the MR and comments on the MR if necessary.
- The MR creator explains the reviewer's comments, makes code changes, etc., and resolves the issues.
- Repeat the 6 -> 7 process until there are no problems, then the reviewer clicks the MR's
Approvebutton. - The MR creator (or the member assigned to the MR) confirms that it has been Approved and clicks the
Mergebutton.
By default,Delete source branchis checked. If you do not want to delete the source branch (feature/issueNNN, etc.) after merging because you will continue working on that branch, uncheck it before clicking theMergebutton.
This is also effective for preventing problems such as the following, which sometimes occur even in companies:
- One person did all the work.
- There was no checking process, or it was not functioning.
- No review was performed.
Creating Issues
When creating an issue, create an appropriate issue.
I wrote something similar in Best Practices for Redmine, but the following points are worth paying attention to.
- Create it at an appropriate level of granularity.
- Give it an appropriate title.
- Write a necessary and sufficient description (overview).
- Do not write multiple tasks.
- Make the completion conditions clear.
- Assign someone to it.
- Set a period (an estimated period is also fine).
- For bugs, include the necessary information such as reproduction steps, environment (browser used, etc.), version, etc.
* When I was working at a certain foreign-affiliated company, I once saw someone register a bug in the BTS (bug tracking system) without writing this kind of information, and get a reply saying, "Don't write a shitty issue. Rewrite it right away." lol.
From here on, features that are not used very often.
Labels
Labels can be added to issues. Labels can be configured per Project. Using them improves the visibility of issues.
* They are particularly useful when displaying a board (Kanban, described below) or a list of issues.
* The background color can also be configured individually, so if labels are properly configured and used, you can eventually tell what kind of information an issue contains from the label color.
They can be configured from the top icon [Project information] > [Labels] in the project's left menu.
I use labels such as the following.
For Kanban
Doing
In progress. Color: #5CB85CTo Do
Planned. Color: #F0AD4E
Close-related
Used to classify Closed issues. Color: #808080
Close: Fixed
Fixed / addressed.Close: Wontfix
Will not be addressed.Close: Duplicate
Duplicate.Close: Invalid
Incorrect.Close: Postponed
Postponed.
Priority-related
Priority.
Priority: CriticalPriority: HighPriority: MiddlePriority: Low
The priority labels can be ordered, so I set the label background colors as a gradient.
From Critical onward: #ff0000, #ff4400, #ff8800, #ffbb00
Type-related
Issue classification. Color: #6699dd
Type: Bug
Bug.Type: Documentation
Document/documentation creation.Type: Feature
Feature addition/extension.Type: Refactoring
Refactoring.Type: Review
Review.Type: Test
Even if the issue list or Kanban simply becomes colorful and makes you feel somewhat better (* personal opinion), there seem to be few disadvantages in terms of improving visibility.
Also, when I configured labels, there were members who interpreted this as meaning that every issue must have a label, but that is not the case.
Depending on the type of label, there may be labels that should be mandatory, but it is not necessarily possible for the issue creator to immediately determine things such as the priority.
Once a label has been assigned, it may be interpreted as meaning that it has already been set and that the assigned label is appropriate. Therefore, for things that cannot be determined reliably at the time of issue creation, I think it is better not to assign a label and instead set it during a discussion or similar.
* There is a feature called Scoped labels, and I thought this would be useful, but it was not available in the non-PREMIUM version.
This feature allows labels in key::value format by putting :: in the label name. This format would be more convenient when assigning labels such as Priority or Severity.
Reference
Milestones
They can be configured/used from Issues > Milestones.
I also use milestones in actual work projects to describe what is planned for each release, but it seems to me that there are not many projects around me that set milestones.
Unless it is a contract development project where the work is simply considered finished once it is delivered, it makes the project easier to understand if you record what you are doing in the current development or what you will do up to the next release (the main purpose and major additions).
You do not need to list individual issues in the milestone, but since a milestone can be set on each issue itself, it can also be used for looking back on things such as:
- Which milestone was this issue implemented in?
- Which issues were addressed in a particular release (Milestone)?
It can also be used to indicate that although an issue has been raised, the task will not be performed in the current milestone (the request is acknowledged, but implementation has not been decided).
Reference
Kanban
It can be used from Issues > Boards.
GitLab calls this "Boards", but I think many people are more familiar with the term Kanban.
By default, GitLab provides the following states:
Open
The state when an issue is created.Closed
Move toClosedwhen the work is completed.- In addition to the above, labels representing states on the Kanban board can be configured.
Personally, I often managed tasks using a Gantt chart in Redmine, but in some projects I also managed tasks using Kanban based on requests from the customer's manager, etc. (For Redmine, I used an Agile plugin.)
We regularly checked tasks with the relevant people on the Kanban board and changed the state of each task.
- Everyone can see the general status of the tasks.
- By operating it with rules such as moving important tasks higher on the board, the importance/priority of tasks can also be visualized.
- Since the assignee is also displayed, it is easier to understand how many tasks each person is handling.
Whether it is suitable or not depends on the type and size of the project, the characteristics of the participating members, etc., so it is not something that must always be used. However, if you have never used it, it may be worth trying.
I think it has good compatibility with situations such as:
- "It is too small a project to make a Gantt chart..."
- When using an agile development methodology.
Reference
Time Management
By using Time tracking and Due dates, it is possible to manage task time and schedules.
Time management for each task (issue) is important when progressing a project.
Personally, I do not think it is necessary to manage time rigidly for a project that is progressing smoothly without needing time tracking, but if situations such as the following continue:
- Progress is not going well.
- You do not know how much effort a task will require.
then it is better to start by making the situation visible.
Problems that are not visible are very often left unresolved / not improved, so making them visible is the first step.
GitLab's Time tracking and Due dates can be used to manage task time and schedules.
For each issue, you can make the situation visible by recording:
- How long it is expected to take
Estimate:/estimate - The actual effort spent
/spend - When it is expected to be completed
Due date
Estimate
You can enter an estimated effort by entering something like /estimate 1w 2d 5h in an issue comment.
- Hints are displayed while entering the command, so use them as a reference.
- Note that 1w == 7d is not the case; 1w = 5d.
- Obviously, 1d = 24h is not the case either, but I do not think anyone gets this wrong.
To cancel an estimate, use remove_estimate.
To change it, enter /estimate xxx again. It seems to overwrite the previous value rather than adding to it, so be careful about this as well.
Actual Effort
Enter it using /spend xxx in an issue comment. The time format is the same as estimate.
* With /spend, the entered value is added to the existing value (unlike /estimate).
If you enter both estimate and spend, a progress bar is displayed in the Time tracking section on the right side of the issue.
Due Date
The due date can be entered in the Due date field on the right side of the issue.
It is also possible to set it using /due xxx in an issue comment, but examples of the format for the xxx part include in 2 days, this Friday, and December 31st, which may be unfamiliar to Japanese users. I recommend setting it using the calendar in the Due date field.
Issues that are past their due date are displayed with a different color, and their display in the To-Do List (accessible from the icon in the upper-right of GitLab) also changes.
Reference
Gantt Chart
Apparently, this can be done with the Roadmap feature with Premium or Ultimate.
I have used https://github.com/lamact/react-issue-ganttchart to display a Gantt chart based on Due dates. If you want to use a Gantt chart with CE or similar, you may want to try it.
* This is not a GitLab feature itself.
MR Draft Feature (formerly WIP)
Below the MR Title input field, there is a message saying Start the title with Draft: to prevent a merge request that is a work in progress from being merged before it's ready.. By clicking the Start the title with Draft: link, you can indicate that this MR is in a draft state.
This feature was formerly called WIP (Work In Progress), and an MR created in Draft state is created with the merge button disabled.
When work is still in progress and not yet complete, but you want reviews or comments (a draft state), you should use the MR Draft feature.
If you manage documents on GitLab and want members to comment or check them, I think this can also be useful.
An MR created in Draft state can also be changed to a non-Draft state using the Mark as ready button after reflecting the review comments. (It can also be returned to Draft state again.)
Reference
Problems That Still Occurred
Even if you establish rules such as the above, problems can still occur.
Here are some specific examples.
What Is This Issue Supposed to Do?
An issue was created with only a title, or with an insufficient overview, and it ended up in a "What is this supposed to do?" state.
The flow was something like this:
- Member B: "There is a problem with XX regarding OO, so we should address it."
- Member A: "I'll handle it."
- Member B: "Please write an issue."
- Member A: "Understood."
- Member A: Creates an issue (title only).
The title itself was something likeDecide OO, which leaves you wondering, "Decide what?"
The issue then remained untouched for some time (for reasons such as other tasks having higher priority).
- Member A: Closes the issue because there was "nothing that needed to be decided."
- Member B: Comments that the problem has not been resolved.
- Member A: Admits that they do not remember anymore.
This problem can be avoided if the issue contains the necessary and sufficient information.
* The same problem may occur repeatedly (based on experience).
* If it keeps happening, it is best to have the members themselves come up with countermeasures, but if that is not possible, prepare an issue template.
Branch Name Does Not Follow the Naming Convention
Follow the naming rules.
When pushing a new branch to GitLab, I recommend checking things such as:
- Is the branch name appropriate?
- What do the existing branches look like?
Problems with the Branch Creation Procedure (Probably)
There was once a problem where an MR included changes that had already been merged.
When creating the feature branch, it seems that the branch was probably created not from the latest develop, but from a local develop that had not been updated to the latest state.
Even if someone accidentally proceeded to create the MR as-is, if they checked the differences before creating the MR (which can be checked on GitLab), they should have noticed that the branch contained changes they had not made in that feature branch.
The reasons for this problem included the following two things:
- The branch creation rules were inadequate.
- There was no review at the time of the MR.
Even when there is no reviewer, you still need to check whether the differences included in the MR are appropriate. In the case of self-review, check them properly yourself.
Summary
I really think you should stop using overly lax permission settings.